|
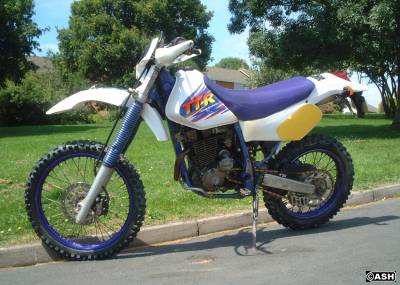
TTR Starter Rebuild.
Although this article is specific to
a Yamaha TTR, much of the advice and tips refer to many a bike and workshop
task.
Nice when new but 11 years can
take its toll on the electric starter!
The Yamaha TTR250 was a very well built
trailbike when it was first introduced in the UK back in 1994. Mind you at
nearly 5 grand (back then) it was expected to be good.
However after 11 years of off-road use and in
some cases abuse, many are now suffering from expensive failures due to the
electric start mechanism wearing and causing big money damage.
The typical cost of replacing all the faulty
bits with new would be around £600, so its worth taking a serious look at the
problem. But many have tried bodging and taking short cuts during the repair,
which nearly always results in it blowing up again very soon and costing twice
as much.
So What Goes Wrong?
An small electric starter motor drives the TTR
flywheel via two sets of idler gears and a one way 'sprag' clutch. Its a very
ingenious design, but after thousands of miles the sprag clutch wears slightly
causing it to not work properly. Two things happen. 1) When stopping the
engine a clunk is heard due to the small amount of freeplay. This puts a
severe shock load back through all the starter gears. 2) When the engine fires
up, the sprag clutch doesn't release quick enough, so it spins the starter
motor and idler gears up at horrendously high speed. Together these two
effects shatter the idler gears and grind the teeth off the starter motor.
As the sprag clutch is over £90 and never
appears damaged it usually gets left in the bike when all the other broken
bits are replaced - and guess what? Its not long before it all happens
again.
Its easy to see why people don't replace a
hopefully okay part at £90, when you realise how much the other parts cost.
Idler gears £55 each. Starter motor £360. Then there is the gaskets, oil,
filter and labour, etc.
I learned the hard way as it happened to me
twice, and it appears I was lucky. When it also happened to a close friend it
wiped out his engine cases as well - mega bucks!
In all these cases if the sprag clutch had been
replaced as soon as it started clunking it would have saved MAJOR money - and
a break down in the middle of nowhere.
So we have blown our starter money and don't
want to fork out £360. Is there anything we can do?
YES, YES, YES and here is
the official 'Biker' way of doing
the repair and saving a few hundred quid -
In this article we are going to look at how
to: Replace a sprag clutch and fix a damaged starter cheaply.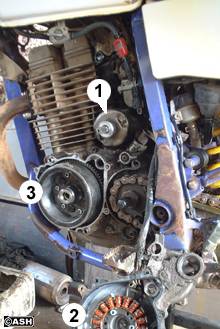
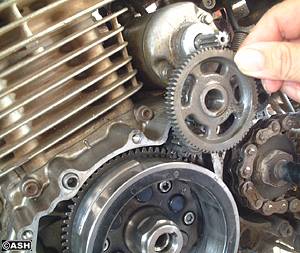
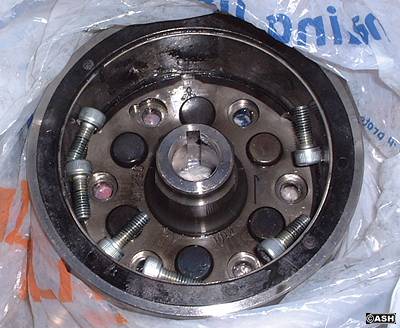
Start by taking off the flywheel generator
cover. NOTE: One of the cover screws is inside a small 3 screw plate which
holds and idler bearing and is located up by the starter motor.
Picture Right:
1) Starter motor location.
2) Flywheel generator cover.
3) Flywheel (sprag clutch is bolted behind)
When this is off you will see how much damage
is done. Check the teeth on the starter for wear or breakages.
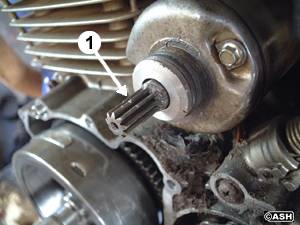
Picture Below:
1) Worn and damaged
teeth on starter motor shaft.
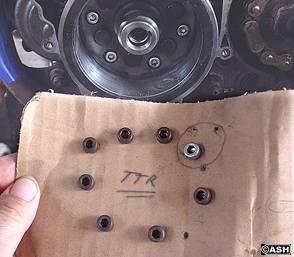
It is a good idea to punch the
case screws through a piece of
cardboard to keep them in the correct order.
When removing the idler gears be careful not to
misplace any of the thin shim washers. Lay all parts out carefully and in
order.
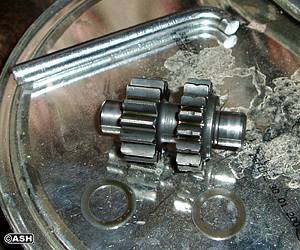
The small idler gear with its 2
shim washers.
Check the teeth on both idlers for wear or
breakages.
The big idler being removed. You
can just see the small idler in behind it.
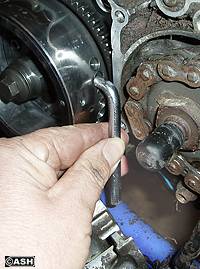
To remove the flywheel a puller
and holder of some sort is needed.
If you don't happen to have
either one handy (like I didn't), you can often use the bikes rear axle as a
puller and fashion a flywheel holder from an old allen key or right angled
screwdriver (see pictures left and below).
Picture Left: Place a suitable
sized allen key into a flywheel balance hole and brace against the bikes
frame.

Bike rear axles often make good
flywheel pullers.
Use a rag to stop teeth damage on
the starter ring.
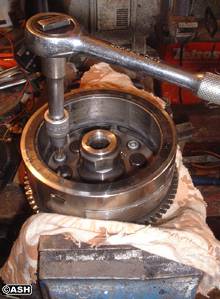
Always undo tough
screws like these (which here hold the flywheel/sprag-clutch/starter-ring
assembly together) by placing the ratchet on the farthest screw head from you.
By levering across the flywheel centre as shown in the photo, you gain a
mechanical advantage over the forces which are trying to rip the whole lot out
of the vice.
This means you do not have to tighten the vice so much and reduces the risk of
teeth damage.
Keep the flywheel sprag clutch
screws safe and wrap the flywheel in a poly bag top keep any metal swarf away
from tis strongly magnetised part.
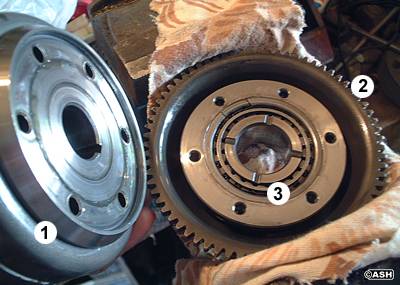
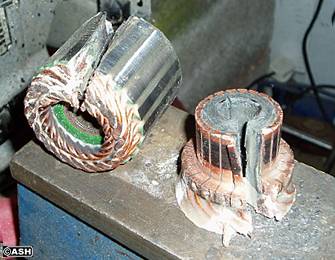
Photo Above: The flywheel (1) is
finally off, leaving the
sprag clutch (3) resting in the starter ring (2).
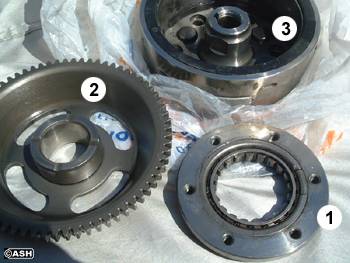
Photo Above: The sprag clutch (1)
just lifts out of the starter ring (2).
If you have had a
serious blow up involving any parts connected with the electric starter. It is
nearly always the sprag clutch which starts the problem. SO LOOK FOR WEAR
VERY CAREFULLY. If in doubt use a magnifying glass to make sure. But if
it 'clonks' loudly when the engine stops, replace it anyway. It will be
£90 well spent.
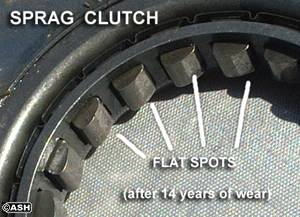
It is not always easy to see the
wear on a sprag
clutch but here it is quite apparent.
NOW FOR THE STARTER ITSELF -
OUCH!!!
What really got to me
was the fact that the Japanese bike manufacturers only sell a complete starter
- not the part that wears, and at £360 a time its no laughing matter. So here
is how we got around it.
Second hand TTR250 starter
motors are as rare as rocking horse manure in the UK. But a trip around a
friendly bike breakers revealed that a cheap FZ600 starter motor - although
looking different and is longer hence it will not fit a TTR - has the same
size diameter motor shaft and gear teeth.
Now unfortunately the shaft
itself and whole armature is just too long to to come out and go inside a TTR
casing. But we can still use it and save lots of cash!
As FZ600's (and other fast road
bikes in general) seem to crash a lot, it is very easy to find a second hand
starter in mint condition quite cheaply.
All we really need is a
replacement shaft with good gear teeth. So basically we take the starter apart
and remove the shaft from the armature itself. Get it machined a little
shorter and insert it into the TTR starter armature.
Here is how to do it in
pictures -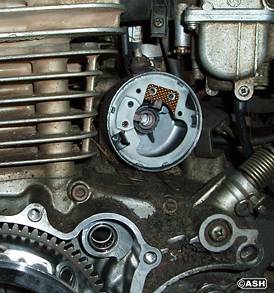
Undo the 2 starter front case
screws and ease it off the engine leaving the rear part of the starter motor
case with brushes still on the engine (this saves hours of stripping the bike
apart to remove the whole unit).
Picture Right:
Main body of starter motor removed leaving rear of starter case with brushes
still in place.
Take the starter apart and lay
out all the parts and shims carefully in the correct assembly order.
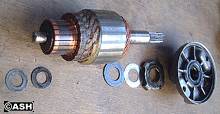
All starter internal
parts in order.
Remove the starter shaft from
the newly aquired second hand unit by grabbing the armature tightly and
bashing it against a strong vice. Doing it this way is good practice for
removing the TTR one next - without damaging the windings etc, which we need
in good order.
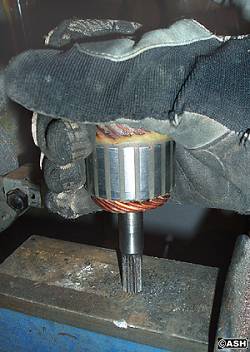
Picture Right:
Here I am bashing the newly machined shaft back into the old TTR armature and
taking care not to damage the gear teeth. The same process was used to knock
it apart in the first place.
It may be a good
idea to put a thin piece of soft aluminium on top of the vice (if you have any
at hand) to make prevent tooth damage.
When you get both
shafts out you will see that the FZ600 shaft is longer than the TTR's and will
need a simple machining job done by a local machine shop.
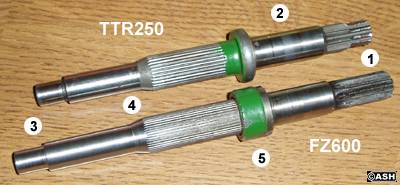
Picture Above:
1) The end that wears out - the gear teeth !!!
2) The measurement from the front of the collar (5) to the gear end of the
shaft should be the same on all FZ600 shafts.
3) This end of the FZ600 shaft was cut back to match the TTR's, this is a
critical measurement.
4) Some FZ600 shafts have a long spline like this one. If so this needs to be
trimmed back too. This length is not critical but needs to be short enough.
5) Shaft positioning collar. Some FZ collars look the same as the TTR's.
NOTE: Some FZ600
shafts have more splines, this repair still works but it is much harder to get
the shaft out, and even harder to bash it back into the TTR armature.
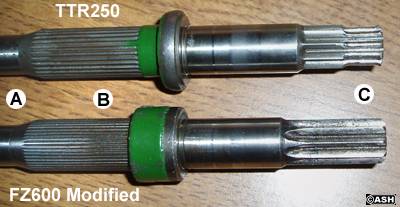
Picture Above:
A) The FZ spline has now been machined back to match the TTR.
B) The armature must be bashed back into exactly the same position - that is
up against the collar or where the green laquer starts.
C) the gear teeth damage on the old TTR shaft can clearly be seen.
Picture Above:
It was so difficult to get the armature off one of the FZ600 starter motors
that we had to hacksaw it and then wedge a chisel into the cut to loosen it
enough to get it moving (this was a newer motor with extra splines, the
trouble is you can not tell which is which until you get them apart!). Be
careful you do not cut into the shaft.
DONT cut the TTR
armature off - WE NEED IT, it is a special short one and I have not found an
equivalent - so take good care of it.
Yes it hurts bashing the
armature back in (old bones you know). Wear a good strong glove, it helps.
The front needle bearing on the
TTR starter is also possible worn through being over-reved. Some FZ600
starters have an identical end case with a much newer bearing in - use the
whole end cap if you can.
Done properly this job isn't a
bodge and therefore it should last another 10 years. It may have taken a
few hours but it saved over £250. The second hand starter cost me £50
and another £25 for machining - AND if I had replaced the sprag clutch in the
first place I would have saved over £500 altogether as I wouldn't have had to
replace all the gears and starter twice on the same bike !!!
When reasembling take care to
shim all the starter and idler gear parts up correctly. Flush all broken gear
teeth out off the engine. And change the oil and oil filter as it will be full
of metal swarf if any teeth have been damaged.
Finally best of luck and as its
now 2005 -
DISCLAIMER: Biker's website and the Author are only offering this
article for readers interest and are not suggesting that anyone should follow
these what may to some look like instructions and therefore we are not
responsible for anyone who attempts this work and certainly not if they are
not skillful enough to do it properly!
|